Table of Contents
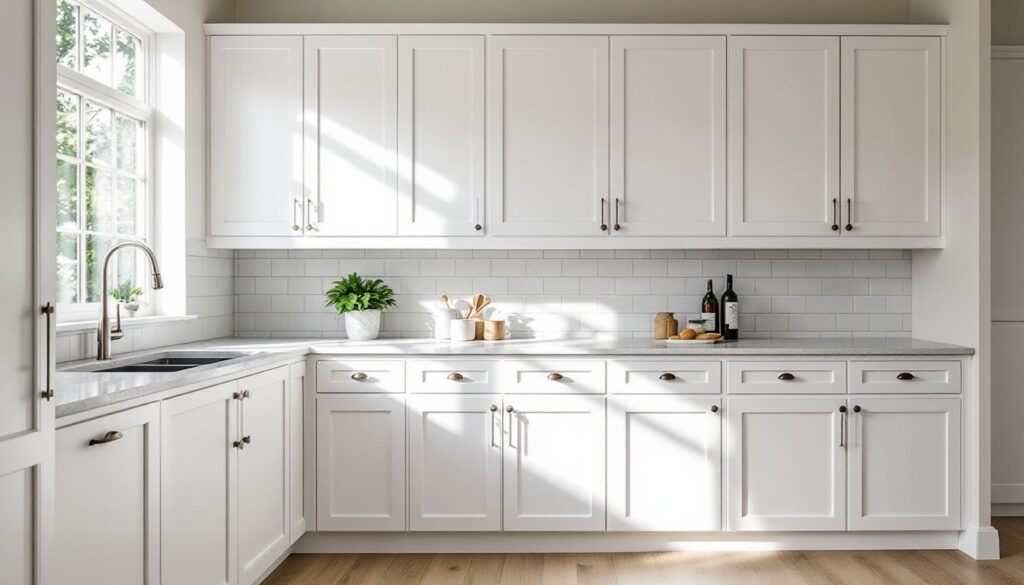
ToggleShaker cabinets have dominated American kitchens for decades, but there’s a new player in town: slim shaker cabinets. These streamlined versions take the classic five-piece door design and pare it down, narrower stiles, thinner rails, and a more delicate profile that fits today’s minimalist aesthetic without sacrificing durability. If you’re planning a kitchen remodel or a cabinet refresh, understanding how slim shakers differ from traditional builds can help you nail the look you want while staying within budget and code.
Key Takeaways
- Slim shaker kitchen cabinets feature narrower stiles and rails (1½–2 inches vs. 2¼–2½ inches), delivering a sleeker, more contemporary profile while maintaining the same structural integrity as traditional shaker cabinets.
- These narrower frames pair best with modern farmhouse, Scandinavian minimalist, transitional, contemporary, and industrial kitchen styles, and their lighter visual weight prevents cabinets from overpowering open-concept homes.
- Choose hardwood for stained finishes, MDF for painted cabinets, or plywood for a balanced option—each material affects durability, cost, and paint adhesion differently.
- Expect to pay $80–$150 per linear foot for stock slim shaker cabinets, $150–$300 for semi-custom options, or $300–$600+ for fully custom builds with 12–16 week lead times.
- Precise installation is critical because narrow stiles show misalignment more noticeably; carefully shim, level, and align doors to ⅛ inch gaps for a professional result.
- Material savings of 5–10% compared to full-width shakers are modest, but proper finishing with two primer coats and two paint coats (or stain plus polyurethane) ensures long-lasting durability.
What Are Slim Shaker Kitchen Cabinets?
Slim shaker cabinets, sometimes called skinny shaker kitchen cabinets or narrow-rail shakers, feature the same recessed center panel and simple frame construction as standard shaker doors, but with stiles and rails that measure 1½ to 2 inches wide instead of the traditional 2¼ to 2½ inches. That half-inch to full-inch reduction might sound trivial, but it creates a noticeably sleeker silhouette.
The frame is typically built with mortise-and-tenon joinery or doweled joints, and the center panel floats inside the frame to allow for seasonal wood movement. Most manufacturers use ¾-inch plywood or MDF for the panel, though solid hardwood is an option for painted finishes. The slimmer profile doesn’t compromise structural integrity, when properly joined and finished, these doors handle daily use as well as their beefier cousins.
Key differences from traditional shaker cabinets:
- Stile and rail width: 1½–2 inches vs. 2¼–2½ inches
- Visual weight: Lighter, more delicate appearance
- Hardware compatibility: Works best with smaller knobs or pulls (avoid oversized handles that dwarf the narrow frame)
- Material options: Hardwoods like maple, oak, and cherry: or primed MDF for painted finishes
Why Slim Shaker Cabinets Are Trending in Modern Kitchens
The shift toward slim shakers isn’t just about aesthetics, it’s driven by practical design trends and evolving kitchen layouts. Open-concept homes demand cabinets that don’t visually overpower adjacent living spaces, and slim profiles deliver that restraint. They also photograph well, which matters in a world where kitchen design ideas drive real estate appeal.
Homeowners are pairing them with large-format tile backsplashes, quartz countertops, and integrated appliances to create a cohesive, gallery-like feel. The narrow frames let bold materials, like honed granite or zellige tile, take center stage without competing for attention.
Another factor: taller ceiling heights in new construction. Standard shaker doors can look chunky when stacked to 10- or 12-foot ceilings. Slim versions maintain proportion and prevent that “heavy” look. They’re also popular in butler’s pantries and walk-in pantries, where floor-to-ceiling cabinetry benefits from visual lightness.
From a cost perspective, narrower stiles use slightly less material per door, though the savings are modest, expect a 5–10% reduction in material cost compared to full-width shakers. Labor costs remain similar because joinery complexity doesn’t change.
Best Kitchen Styles to Pair with Slim Shaker Cabinets
Slim shakers are versatile, but they shine brightest in these kitchen styles:
Modern Farmhouse: Pair white or off-white slim shakers with matte black hardware, apron-front sinks, and open shelving. The narrow frame keeps things from veering into “country cottage” territory. Add brushed nickel or aged brass pulls for warmth.
Scandinavian Minimalist: Light wood tones (white oak, birch, or ash) with flat-panel or slim shaker doors create that clean-lined Scandi look. Skip upper cabinets entirely or use glass-front uppers to maintain openness. Pair with butcher-block countertops and under-cabinet LED strips.
Transitional: Mix slim shaker lowers in a deep navy or charcoal with white uppers. This high-contrast approach works well with marble or quartz countertops and stainless appliances. Use larger pulls (3¾-inch or longer) on drawers, smaller knobs on doors.
Contemporary: Go slab-door on some cabinets and slim shaker on others, an island with slim shakers and perimeter cabinets in flat-panel keeps things interesting without clashing. Interior designers on home decorating platforms have been pushing this mixed-door trend since late 2024.
Industrial: Slim shakers in natural walnut or stained oak pair surprisingly well with exposed brick, concrete counters, and metal shelving. The refined frame balances raw textures.
Choosing the Right Materials and Finishes
Material choice affects durability, cost, and paint adhesion. Here’s what you need to know:
Hardwood (Maple, Oak, Cherry): Best for stained finishes where you want visible grain. Maple takes paint well and is the go-to for crisp, smooth painted cabinets. Red oak has prominent grain that shows through paint unless you use a heavy primer like BIN shellac-based primer. Cherry darkens beautifully over time but costs more, expect $150–$250 per linear foot installed for cherry slim shakers.
MDF (Medium-Density Fiberboard): Ideal for painted finishes. It’s dimensionally stable (no wood movement), takes paint like glass, and costs less than hardwood. Downside: edges can dent more easily, and it’s heavier. Use ¾-inch MDF for door panels: anything thinner feels flimsy.
Plywood: A middle ground. Baltic birch or maple plywood offers good stability and takes paint or stain well. It’s lighter than MDF and more dent-resistant.
Finish options:
- Paint: Two coats of primer (oil-based for hardwood, acrylic for MDF) plus two coats of acrylic enamel or alkyd paint. Spray application yields the smoothest finish, brush marks are hard to avoid on narrow stiles.
- Stain + Polyurethane: Gel stains work best on hardwoods for even color. Seal with three coats of water-based polyurethane (less yellowing than oil-based). Sand lightly with 220-grit between coats.
- Clear coat: For natural wood, skip stain and go straight to poly or hard wax oil for a matte, hand-rubbed look.
Don’t skip wood conditioner on soft or porous woods like pine or alder, it prevents blotchy stain absorption.
Installation Tips for DIY Homeowners
Installing slim shaker cabinets isn’t fundamentally different from standard cabinet work, but the narrow frames demand precision. Here’s what to watch for:
1. Find and mark studs. Use a stud finder and mark centerlines with a level and pencil. Wall cabinets must be anchored into studs, typically 16 inches on center, with at least two 3-inch cabinet screws per unit. Drywall anchors aren’t sufficient for the load.
2. Establish a level reference line. Measure up 54 inches from the floor (standard height for upper cabinets) and strike a level line across the wall. If your floor isn’t level, and most aren’t, measure from the highest point.
3. Start with upper cabinets. Install these first so you’re not leaning over base cabinets. Use a cabinet jack or build a temporary ledger from a straight 2×4 screwed into studs just below your reference line. This holds cabinets in place while you fasten them.
4. Shim as needed. Walls are rarely plumb. Slip wood shims behind cabinets at screw locations to bring faces flush and plumb. Check with a 4-foot level frequently. Don’t overtighten screws, you’ll crack panels or pull frames out of square.
5. Join adjacent cabinets. Clamp face frames together and drill pilot holes for 1¼-inch screws through the stiles. Two screws per joint is standard. For narrow stiles, drill carefully, off-center holes can split the wood.
6. Install base cabinets. Most codes require base cabinets to sit on a ¾-inch plywood platform (toe-kick base) for stability and to keep them off subfloor moisture. Level front to back and side to side, shimming under the platform as needed. Fasten to wall studs with 3-inch screws through the nailer strip at the top rear of the cabinet.
7. Hang doors and adjust hinges. Most cabinets use European hinges (also called cup hinges) with three-way adjustment: in/out, up/down, and left/right. Start with all doors roughly aligned, then fine-tune gaps to ⅛ inch between doors and 3/16 inch at the frame. A narrow stile shows misalignment more than a wide one, so take your time.
Safety notes: Wear safety glasses when drilling overhead. Have a helper for upper cabinets, even lightweight units are awkward solo. If you’re removing old cabinets, shut off power to any outlets or switches in the work area and verify with a non-contact voltage tester.
Cost Considerations: Budgeting for Slim Shaker Cabinets
Pricing varies wildly based on material, finish, and whether you’re buying stock, semi-custom, or custom cabinets. Here’s a breakdown as of early 2026:
Stock cabinets (home centers): Expect $80–$150 per linear foot for painted MDF or basic maple slim shakers. These come in standard widths (12, 15, 18, 24, 30, 36 inches) and heights. Limited color and hardware options, but they’re available immediately.
Semi-custom (online retailers or local shops): $150–$300 per linear foot installed. You choose door style, finish, and some internal options (soft-close hinges, pull-out shelves, drawer dividers). Lead times run 6–10 weeks.
Custom (cabinet makers): $300–$600+ per linear foot. Fully tailored to your space and specs. Expect 12–16 weeks for fabrication. Worth it if you have odd dimensions, want specific joinery, or need matching built-ins.
Add-ons that affect cost:
- Soft-close hinges and drawer slides: Add $15–$25 per door or drawer.
- Interior upgrades: Pull-out spice racks, lazy Susans, and drawer organizers add $50–$200 per feature.
- Crown molding and trim: Budget $10–$20 per linear foot for materials, more if you hire out the install.
- Hardware: Quality pulls and knobs run $3–$15 each. A typical kitchen needs 30–50 pieces.
DIY vs. pro install: If you’re handy and have basic tools (drill, level, saw), you can save $1,500–$4,000 on labor for an average kitchen. Pro install typically costs $60–$100 per cabinet (some charge per linear foot instead). If walls aren’t plumb or you’re dealing with older framing that’s out of square, hiring a pro can prevent costly mistakes. Many renovation inspiration resources recommend getting at least a consultation before tackling a full kitchen solo.
Budget tip: Order a sample door before committing to a full kitchen. Check for smooth finish, solid joinery, and accurate dimensions. Returns on custom cabinets are often non-existent.
Conclusion
Slim shaker cabinets deliver classic appeal with a contemporary edge, fitting seamlessly into modern kitchens without demanding a complete design overhaul. Whether you’re refreshing an outdated space or building new, the narrow profile and clean lines adapt to nearly any style. Measure twice, invest in quality materials, and don’t rush the install, those narrow stiles are less forgiving of sloppy gaps. Done right, they’ll look sharp for decades.