Table of Contents
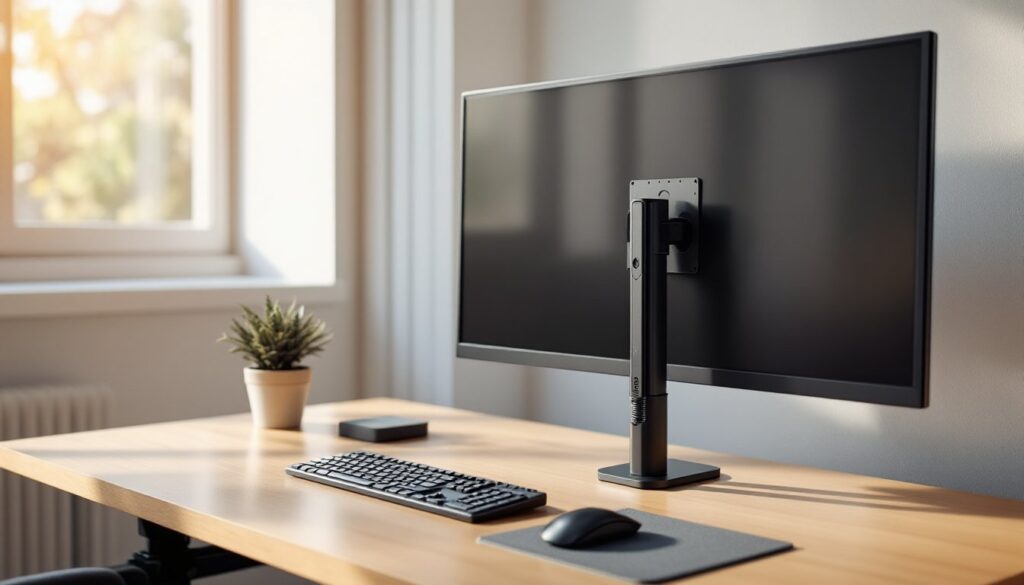
ToggleIf you’ve ever spent a workday hunched over a poorly positioned monitor, you know the toll it takes on your neck, shoulders, and focus. The Fully Jarvis single monitor arm promises a solution: a gas-spring arm that clamps to your desk and lets you adjust screen height, tilt, and depth with minimal effort. Unlike fixed stands or cheap arms that sag after a few months, this mount is engineered for smooth, stable positioning and long-term durability. Whether you’re building a dedicated home office or upgrading an existing workspace, understanding what this arm delivers, and what it demands from your desk and monitor, will help you decide if it’s the right fit.
Key Takeaways
- The Fully Jarvis single monitor arm uses a gas-spring mechanism to support monitors between 5–28 lbs with smooth, drift-free positioning and a 10-year warranty, making it a durable long-term investment.
- Proper monitor placement with the Jarvis arm reduces neck and shoulder strain by positioning screens at eye level and 20–28 inches away, significantly improving ergonomic comfort for home offices.
- Installation takes 15–20 minutes and includes two clamp options (C-clamp or grommet mount) to fit most desk types, with integrated cable management and compatibility with standard VESA 75 × 75 and 100 × 100 mm patterns.
- The arm’s 360-degree rotation, 180-degree tilt, and 12.6-inch vertical travel allow quick one-handed adjustments, making it ideal for dynamic workspaces with multiple users or alternating sitting and standing positions.
- While the Fully Jarvis single monitor arm costs more than budget alternatives, its gas-spring design consistently outperforms friction-based models in reliability, eliminating sagging and re-tightening over years of daily use.
What Makes the Fully Jarvis Single Monitor Arm Stand Out
The Jarvis single monitor arm uses a counterbalance gas-spring mechanism to support displays between 5 and 28 pounds, covering most 24- to 32-inch monitors. This isn’t a friction hinge that loosens over time: it’s a sealed pneumatic cylinder that maintains tension without manual adjustments. The arm extends 21.3 inches from the mounting post and offers 12.6 inches of vertical travel, so you can lift a screen from desk level to standing height or drop it low for secondary use.
The mount includes both a C-clamp (for desk edges up to 2.4 inches thick) and a grommet clamp (for desks with a cable-management hole). Both clamps attach to the same vertical post, which houses the cable-management channel. The arm itself rotates 360 degrees at the base, and the VESA plate pivots for portrait or landscape orientation.
Compared to budget arms, the Jarvis uses thicker-gauge steel and a larger gas spring, which translates to less drift when you’re typing or bumping the desk. Many smart home product reviews point to build quality as a deciding factor for desk accessories, and the Jarvis delivers on that front with minimal flex during adjustment.
Key Features and Specifications
- VESA Compatibility: 75 × 75 mm and 100 × 100 mm patterns
- Weight Range: 5–28 lbs (2.3–12.7 kg)
- Reach: 21.3 inches from post center to VESA plate
- Height Range: 12.6-inch vertical adjustment
- Rotation: 360° at base, 180° tilt, 360° monitor rotation
- Clamp Options: C-clamp (0.4–2.4 inches) or grommet mount (0.4–2.6 inches)
- Cable Management: Integrated channel in post and arm
- Material: Steel construction with powder-coat finish
- Warranty: 10 years (check with manufacturer for specific coverage)
The Fully monitor arm ships with all mounting hardware, including hex keys and washers, so you won’t need to hunt for fasteners mid-install.
Installation and Setup: A Step-by-Step Guide
Installing the Jarvis arm takes about 15 to 20 minutes if your desk meets the thickness and depth requirements. You’ll need the included hex keys, and safety glasses are a good idea when working underneath the desk.
Materials and Tools:
- Fully Jarvis single monitor arm (with clamp and hardware)
- Phillips-head screwdriver
- Hex keys (included)
- Safety glasses
- Tape measure
- Optional: small level for alignment
Step-by-Step Installation:
-
Choose Your Clamp Location. Measure your desk thickness with a tape measure. If it’s 0.4 to 2.4 inches thick, use the C-clamp on the rear edge. If you have a grommet hole (typically 0.5 to 2.5 inches in diameter), use the grommet mount instead. Make sure there’s no crossbar or drawer assembly blocking the underside, the clamp needs full contact with the desktop.
-
Attach the Post. Slide the C-clamp onto the desk edge or insert the grommet mount through the hole. Thread the mounting bolt hand-tight from below, then finish with the hex key until snug. Don’t overtighten, two full turns past hand-tight is usually enough. Over-torquing can crack laminate or compress particleboard cores.
-
Mount the Arm to the Post. The arm sleeve slides over the post and locks with a setscrew. Adjust the sleeve height so the arm is roughly at mid-desk level before tightening. This gives you the widest range of vertical adjustment once the monitor is attached.
-
Attach the VESA Plate to Your Monitor. Remove the factory stand from your monitor (consult your monitor’s manual for release tabs or screws). Align the VESA plate with the 75 × 75 mm or 100 × 100 mm mounting holes on the monitor’s back panel. Use the included M4 screws and a Phillips screwdriver to secure the plate. Double-check that all four screws are seated, loose screws can cause the monitor to tilt or sag.
-
Hang the Monitor on the Arm. The VESA plate hooks onto the arm’s mounting bracket. Lift the monitor, align the plate, and slide it into place until you hear or feel it lock. Give it a gentle tug to confirm it’s secure.
-
Adjust Gas-Spring Tension. With the monitor attached, test the arm’s vertical movement. If the screen drifts upward on its own, the spring is too tight: if it sags, it’s too loose. Turn the tension dial (located on the arm near the spring housing) with the included hex key: clockwise to increase tension, counterclockwise to decrease. Make small adjustments, one-quarter turn at a time, and test after each change.
-
Route Cables Through the Arm. Feed your display cable and power cord through the cable clips in the post and along the arm. This keeps cords out of sight and prevents snagging when you adjust the monitor.
Safety Note: If your desk is made of glass, consult the manufacturer before clamping. Most tempered-glass desks require a protective pad to distribute pressure and prevent cracking.
Once installed, the arm should move smoothly through its full range without sticking or sagging. If you encounter resistance, recheck the tension dial and confirm that no cables are binding the joints.
Ergonomic Benefits for Your Home Office
Proper monitor height and distance reduce strain on your cervical spine and upper back. The American Optometric Association recommends positioning the top of your screen at or slightly below eye level, with the display 20 to 28 inches from your eyes. A fixed stand can’t adapt to different users, chair heights, or tasks, but the Jarvis arm lets you dial in those settings quickly.
The gas-spring mechanism means you can reposition the monitor without loosening knobs or levers, just push or pull the screen where you want it. This is especially useful if you alternate between sitting and standing with a height-adjustable desk. Instead of craning your neck or hunching forward, you lift the monitor in one motion.
For home offices with multiple users (or if you switch between keyboard work and leaning back for video calls), the arm’s tilt and swivel functions let you pivot the screen without moving your chair. The 180-degree tilt range handles steep viewing angles, and the 360-degree rotation supports portrait mode for document editing or coding.
Many of the home tech trends covered in recent ergonomic guides emphasize adjustable mounts as a baseline upgrade, one that costs less than a new chair but delivers measurable comfort improvements.
Design and Build Quality: What to Expect
The Jarvis arm uses 16-gauge steel for the main arm tubes and a powder-coated finish in black, white, or gray. The coating resists chips and fingerprints better than bare metal, and the matte texture blends with most desk setups without drawing attention.
Joint covers are molded plastic, not metal, but they’re thick enough to avoid flexing under normal use. The gas spring is the largest component, about 2 inches in diameter, and it’s housed in a steel sleeve that attaches to the vertical post. This is where cheaper arms often fail: undersized springs sag under load or lose pressure within months. Fully’s spring is rated for 30,000 adjustment cycles, which translates to years of daily repositioning.
Cable-management clips are integrated into the arm and post, with spring-loaded covers that snap open and closed. They hold standard display cables and power cords without pinching, though very thick cables (like some aftermarket HDMI cables with braided sleeves) may require routing outside the clips.
The clamp hardware includes a protective pad to prevent marring your desk finish. If you’re mounting to a solid-wood or butcher-block desk, this pad is essential, metal-on-wood contact can leave dents or scratches over time.
Overall, the Jarvis arm feels like a shop-grade tool rather than a consumer gadget. The joints move with resistance (which is good, it means they won’t drift), and there’s no creaking or rattling when you adjust the screen.
Compatibility and Monitor Requirements
The Jarvis arm works with any monitor that has a VESA 75 × 75 mm or 100 × 100 mm mounting pattern and weighs between 5 and 28 pounds. Most 24- to 32-inch displays fall within this range, but ultrawide or gaming monitors with heavy bezels and built-in speakers may exceed 28 pounds, check your monitor’s spec sheet before ordering.
If your monitor weighs less than 5 pounds (common with lightweight portable displays), the gas spring may push it upward even at minimum tension. In that case, you’ll need to add weight to the VESA plate or choose a lighter-duty arm.
The arm’s 21.3-inch reach means you need at least 24 inches of desk depth to pull the monitor close without the arm hitting the wall. Shallow desks (less than 20 inches deep) may limit the arm’s range of motion.
Curved monitors are compatible as long as the VESA pattern is centered on the back panel. Some curved ultrawides place the VESA mount off-center, which can throw off the arm’s balance, test the tension adjustment carefully if you’re mounting a curved screen.
The grommet mount requires a hole between 0.5 and 2.5 inches in diameter. Most standing desks and dedicated workstations include a 2-inch grommet hole, but if you’re retrofitting an older desk, you’ll need to drill one (use a hole saw and work from the top down to prevent chipping the veneer).
If you’re using a monitor with a non-removable stand or a display that lacks VESA mounting holes, you’ll need a VESA adapter bracket, these are available for most major brands, though they add cost and installation time.
Pros and Cons: Is It Worth the Investment?
Pros:
- Smooth, Stable Adjustments. The gas spring holds position without drift, even with a 28-pound monitor. You can nudge the screen into place with one hand.
- 10-Year Warranty. Fully backs the arm with a decade of coverage, which is longer than most competitors offer.
- Integrated Cable Management. The channel in the post and arm keeps cords tidy without add-on clips or zip ties.
- Two Clamp Options. The included C-clamp and grommet mount handle most desk configurations without extra purchases.
- Wide Compatibility. VESA 75 and 100 patterns cover the majority of monitors on the market.
Cons:
- Price. The Jarvis arm costs more than budget single-monitor mounts. If you’re outfitting multiple workstations, the price adds up quickly.
- Desk Thickness Limits. Desks thicker than 2.4 inches (for C-clamp) or 2.6 inches (for grommet) require a different mounting solution or a custom spacer.
- No Quick-Release VESA Plate. Removing the monitor requires unscrewing the VESA plate, which is fine for permanent setups but inconvenient if you swap displays frequently.
- Weight Floor of 5 Pounds. Ultralight portable monitors may not have enough mass to overcome the gas spring’s minimum tension.
For home offices where monitor positioning directly affects comfort and productivity, the Jarvis arm is a long-term upgrade. It won’t sag, stick, or need constant re-tightening. If you’re already investing in an adjustable desk or ergonomic chair, the arm completes the ergonomic triangle, and the 10-year warranty means you won’t be replacing it when you upgrade your monitor.
On the other hand, if you rarely adjust your screen or your monitor already sits at the right height, a fixed stand or basic arm may be enough. The Jarvis arm’s advantages are most visible in dynamic workspaces where you switch postures, share the desk, or need precise screen positioning for tasks like photo editing or CAD work.
According to product reviews covering desk accessories, single-monitor arms with gas springs consistently outperform friction-based models in long-term reliability, something worth considering if you plan to keep your setup for years.