Table of Contents
ToggleA cramped kitchen doesn’t mean sacrificing workspace or dining options. The drop leaf kitchen island offers homeowners a practical solution that adapts to daily needs without permanently eating up floor space. Unlike traditional fixed islands, these units feature hinged leaves that fold down when not in use, giving cooks and entertainers flexibility that static designs can’t match. Whether preparing weeknight dinners or hosting weekend guests, a kitchen island with leaf extensions transforms square footage from tight to functional. This guide walks through what makes these islands work, how to choose the right one, and how to install it properly.
Key Takeaways
- A drop leaf kitchen island collapses to 24 inches deep when not in use, making it ideal for small kitchens where fixed islands would require 42–48 inches of permanent clearance.
- Drop leaf islands offer flexible space by serving as workspace during meal prep and converting to dining or breakfast bar seating with hinged leaves that fold up and down as needed.
- When selecting a drop leaf island, prioritize heavy-duty hardware including ball-bearing casters rated for 100+ pounds and hinges designed specifically for drop leaves to ensure long-term durability and safety.
- Material choice impacts performance: butcher block offers a forgiving cutting surface, stainless steel provides heat resistance, and granite or quartz requires robust support due to added weight of 50–100 pounds.
- Installation typically takes 1–2 hours and includes leveling the base, testing leaf support mechanisms under load, and ensuring the island doesn’t block the work triangle (sink-stove-fridge) or obstruct traffic flow.
- Freestanding drop leaf islands don’t require permits, but adding plumbing or hardwired electrical demands a licensed professional and inspection to comply with building codes and protect your homeowner’s insurance coverage.
What Is a Drop Leaf Kitchen Island and How Does It Work?
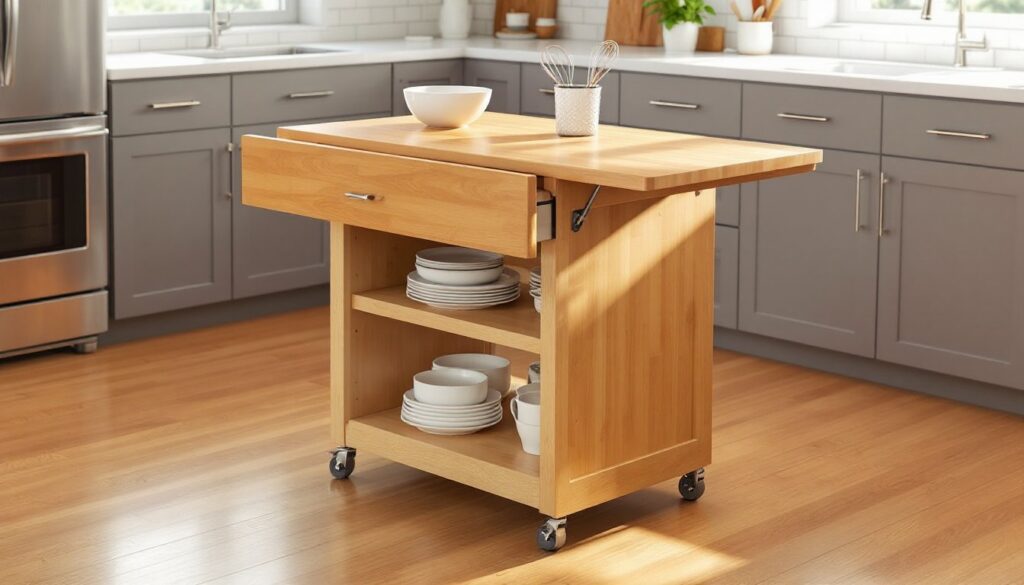
A drop leaf kitchen island is a freestanding or semi-permanent kitchen unit with one or two hinged surfaces that fold down or up as needed. The leaves attach to the main body using drop leaf hinges or rule joints, traditional joinery that allows the surface to pivot and lock into place.
When raised, the leaf is supported by a swing-out bracket, pull-out leg, or gate-leg mechanism. These supports are critical: a 12-inch leaf extending 30 inches can bear significant load during meal prep or dining, so the hardware must be rated for at least 50 pounds per side.
Most units range from 24 to 36 inches wide in their base configuration, with leaves adding another 10 to 15 inches per side. When both leaves are raised, total width can reach 48 to 60 inches, providing seating for four or a full-size prep surface. When folded, the island tucks into narrow galleys or against walls without blocking traffic lanes.
The base typically includes storage, shelves, drawers, or wine racks, so the unit does double duty. Casters are common, especially on lighter models under 150 pounds, allowing the island to roll out for use and back against a wall afterward. Locking casters are non-negotiable: an island that shifts mid-chop is a safety hazard.
Key Benefits of Adding a Drop Leaf Island to Your Kitchen
Maximizing Space in Small and Medium-Sized Kitchines
In kitchens under 150 square feet, every inch counts. A fixed island demands a minimum clearance of 42 to 48 inches on all sides per most building codes (check local IRC guidelines), which rules them out for many layouts. A drop leaf island collapses to as little as 24 inches deep, freeing up walkways when the cook isn’t actively prepping.
This flexibility matters during high-traffic moments, getting kids to school, unloading groceries, or moving appliances. Homeowners can raise the leaf for weekend baking sessions, then drop it Monday morning to restore flow. For renters or those in transitional spaces, portability is a bonus: most drop leaf islands weigh 75 to 200 pounds and move without professional rigging.
Another advantage: zoning. A collapsed island can define the kitchen boundary in an open-plan home without creating a visual wall. When extended, it becomes a natural gathering point, pulling double duty as both workspace and social anchor.
Versatile Dining and Workspace Options
A raised leaf converts the island into a breakfast bar, buffet station, or assignments desk. Standard counter height is 36 inches, which works for both standing prep and stool seating. Bar-height models at 42 inches are available but less common and can feel awkward for detailed tasks like rolling dough or decorating cookies.
For dining, plan 24 inches of width per person. A 30-inch leaf supports one diner comfortably, two in a pinch. Pair with backless stools that tuck completely under the overhang, 12-inch depth minimum, to keep the floor clear.
As workspace, the extended surface handles appliances that don’t fit on perimeter counters: stand mixers, food processors, or slow cookers. Many woodworking project plans for custom islands include outlets or pop-up power strips in the base, though adding electrical to a portable unit may require a licensed electrician and inspection depending on jurisdiction. Battery-powered or cord-reach solutions are simpler for DIYers.
Choosing the Right Drop Leaf Kitchen Island for Your Home
Size, Materials, and Style Considerations
Start by measuring the kitchen’s usable floor space with doors, drawers, and appliances open. Subtract 42 inches minimum from each side of the proposed island location to ensure code-compliant clearance. The remaining footprint determines base width.
Next, decide on leaf size. If the goal is seating, measure existing chairs or stools: most require 18 to 20 inches from the seat front to the counter edge for leg clearance. If it’s prep space, consider what tasks the island will handle. A 12-inch leaf is fine for plating and light cutting: serious baking or butchering needs 15+ inches.
Material choices affect durability, maintenance, and cost:
- Butcher block: Maple, oak, or walnut offer warmth and a forgiving cutting surface. Requires regular oiling and isn’t heatproof. Expect $400–$900 for quality units.
- Stainless steel: Commercial-grade, heat-resistant, and sanitary. Shows fingerprints and scratches easily. Typically $600–$1,200.
- Granite or quartz: Heat- and stain-resistant but heavy (adds 50–100 pounds). Leaves must have robust support. Usually $800–$1,500+.
- MDF or particleboard with laminate: Budget-friendly ($200–$500) but won’t survive moisture or heavy use long-term. Fine for light-duty or temporary setups.
Frame construction matters too. Solid hardwood or welded steel frames outlast thin pine or hollow-core designs. Check joint quality: mortise-and-tenon or doweled joints are stronger than butt joints held by screws alone.
For style, match existing cabinetry or choose a contrasting accent. Painted finishes (white, gray, navy) suit farmhouse or transitional kitchens. Natural wood or industrial metal fits modern or rustic spaces. If buying ready-made, brands like Crosley, Home Styles, and Winsome offer a range: for custom builds, furniture building tutorials walk through joinery and finishing techniques.
Hardware, hinges, brackets, and casters, should be heavy-duty. Look for ball-bearing casters rated for at least 100 pounds each and hinges designed specifically for drop leaves, not standard cabinet hardware. Upgrade these components if the stock versions feel flimsy: it’s a $30 fix that extends the island’s life by years.
Installation and Placement Tips for Drop Leaf Islands
Most drop leaf islands arrive partially assembled. Budget 1 to 2 hours for final assembly: attaching legs, installing casters, and mounting leaves. You’ll need a drill/driver, adjustable wrench, level, and possibly a rubber mallet.
Step-by-step setup:
- Unpack and inventory parts. Lay out hardware and compare against the manual. Missing a bracket now is easier to fix than halfway through.
- Attach the base legs or casters. If using casters, install locking ones on the front to prevent rolling during use. Tighten all bolts snugly but don’t over-torque: stripped threads in softwood are common.
- Mount drop leaf hinges. Align the hinge barrel exactly with the edge of the base: even a 1/8-inch gap causes binding. Pre-drill screw holes to prevent splitting, especially in hardwood. Some designs use a rule joint (a rounded edge on the base, concave on the leaf) which hides the hinge when open, these require precise alignment.
- Install leaf supports. Swing-out brackets or gate legs must lock firmly in both the open and closed positions. Test the mechanism several times: if it’s sticky, sand the pivot point or apply a drop of oil.
- Level the island. Use a 24-inch level across both the base and raised leaves. Adjustable feet (common on fixed models) make this easy: for castored units, adjust by shimming or repositioning. An unlevel surface causes items to roll off and creates uneven wear.
- Test load capacity. Place 25 to 50 pounds (a bag of flour, gallon jugs) on each raised leaf and check for sag or bracket flex. If either seems weak, reinforce supports before regular use.
Placement considerations:
- Traffic flow: Position the island so raised leaves don’t block the refrigerator, stove, or sink. The classic work triangle (sink-stove-fridge) should remain unobstructed.
- Ventilation and heat: Keep the island at least 18 inches from a range or cooktop. Heat and grease buildup degrade finishes and can warp leaves over time.
- Lighting: If the island will serve as a dining or task surface, ensure overhead lighting reaches it. Pendant lights at 30 to 36 inches above the counter work well for bar-height seating.
- Flooring protection: Castored islands can scratch hardwood or tile. Use rubber or felt caster wheels, or place a low-profile mat under stationary placements.
Permits and codes: Freestanding islands typically don’t require permits since they’re not permanently installed. But, if adding plumbing (a sink) or hardwired electrical (outlets, lighting), most jurisdictions require a permit and inspection per NEC and IRC standards. A licensed plumber or electrician is recommended for these modifications, DIY electrical work often voids homeowners insurance if a fire occurs.
Maintenance: Wipe down surfaces after each use. For wood, reapply food-safe mineral oil or cutting board conditioner every 4 to 6 weeks. Tighten hardware quarterly: vibration from daily use loosens bolts over time. Lubricate hinges and brackets annually with a dry lubricant (silicone or PTFE spray) to prevent squeaking and sticking.
If building a custom unit, DIY kitchen island projects provide cut lists, material specs, and step-by-step photos. Standard materials include 2×4 framing (actual dimensions 1.5 x 3.5 inches), 3/4-inch plywood for sides, and 1.5-inch hardwood for tops. Joints are typically pocket-screwed (use a Kreg jig for consistent holes) and glued. Finishing involves sanding to 220 grit, priming (if painting), and two topcoats of polyurethane or water-based sealer.
Safety reminder: Always wear safety glasses when drilling or sawing, and hearing protection if using power tools for extended periods. Work in a ventilated area when applying finishes: oil-based products release VOCs that require respirator use per OSHA guidelines in enclosed spaces.